Access Control List ACL Configuration on Cisco Router
It explains Access Control List ACL Configuration on Cisco Router. If you want to learn what is Access Control List, you can visit the previous post.To use standard ACLs numbered on a Cisco router, you must first create the standard ACL and then activate it on an interface.
The global access-list configuration command defines a standard ACL with a number between 1 and 99. Version 12.0.1 of the Cisco IOS software extended that range and allows numbers ranging from 1300 to 1999 to be used for standard ACLs . This allows a maximum of 798 possible standard ACLs to be generated. These additional numbers are called extended IPv4 ACLs.
List of Contents For ACL Configuration
1. Commands to configure ACL
2. Modify IPL4 ACL
3. VTY Port Protection with Standard IPv4 ACL
Commands to configure ACL
For ACL you can configure standard ACL on Cisco Router using the following commands syntax:Router (config) # access-list access-list-number {deny | permit | remark} source [source-wildcard] [log]
In the
following table, the syntax for a standard ACL is explained in detail.
|
Parameter
|
Description
|
|
access list number
|
Number of an ACL. It
is a decimal number from 1 to 99 or from 1300 to 1999 (for standard ACLs).
|
|
deny
|
Deny access if conditions
match.
|
|
allow
|
Allow access if
conditions match.
|
|
remark
|
Add a comment about the
entries in the IP access list to facilitate the understanding and analysis of
the list.
|
|
origin
|
Network or host number
from which the packet is sent. There are two ways to specify the origin.
Use a 32-bit quantity in dotted decimal format of four parts. Use the keyword any as the source abbreviation and source wildcard of 0.0.0.0 255.255.255.255. |
|
source wildcard
|
(Optional) 32-bit
wildcard mask to apply to the source. Place some in the bit positions
that you want to skip.
|
|
Standard ACL command syntax table
access-list
|
|
ACEs
can allow or deny a single host or a range of host addresses. To create a
host instruction in ACL numbered 10 that allows a specific host with IPv4
address 192.168.10.10, you must enter the following:
R1 (config) # access-list 10 permit host
192.168.10.10
ACL REMOVAL
To create an instruction that allows a range of IPv4 addresses in an ACL numbered 10 that allows all IPv4 addresses on the 192.168.10.0/24 network, you must enter the following:
R1 (config) # access-list 10 permit 192.168.10.0 0.0.0.255
To remove the ACL, the global no access-list configuration command is used. Executing the show access-list command confirms that the access list 10 was deleted.
R1 # show access-lists
Standard IP access list 10
10 permit 192.168.10.0, wildcard bits 0.0.0.255
R1 # conf t
Enter configuration commands, one per line. End with CNTL / Z.
R1 (config) # no access-list 10
R1 (config) # exit
R1 # show access-lists
R1 #
Usually, when an administrator creates an ACL, he knows and understands the purpose of each instruction. However, to ensure that the administrator and others remember the purpose of the instructions, comments (remarks) must be included. The remark keyword is used in documents and makes it much easier to understand access lists. The text of each comment has a limit of 100 characters. The ACL shown below, which is quite simple, is used as an example. When the ACL in the configuration is checked using the show running-config command, the comment is also displayed.
R1 (config) # access-list 10 remark Permit hosts from the 192.168.10.0 LAN
R1 (config) # access-list 10 permit 192.168.10.0 0.0.0.255
R1 (config) # exit
R1 # show running-config | include access-list 10
access-list 10 remark Permit hosts from the 192.168.10.0 LAN
access-list 10 permit 192.168.10.0 0.0.0.255
R1 #
APPLICATION OF STANDARD IPV4 ACLS TO INTERFACES
After a standard IPv4 ACL is configured, it is linked to an interface using the ip access-group command in interface configuration mode:
Router (config-if) # ip access-group {access-list-number | access-list-name} {in | out
To remove an ACL from an interface, first enter the no ip access-group command in the interface, and then enter the global no access-list command to remove the entire ACL.
The steps and syntax for configuring and applying a standard numbered ACL on a router are listed below.
1 : Use the global access-list configuration command to create an entry in a standard IPv4 ACL.
R1 (config) # access-list 1 permit 192.168.10.0 0.0.0.255
2 : Use the interface configuration command to select an interface to which to apply the ACL.
R1 (config) # interface serial 0/0/0
3 : Use the ip access-group interface configuration command to activate the current ACL on an interface.
R1 (config-if) # ip access-group 1 out
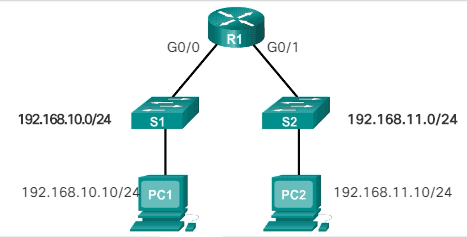
EXAMPLE OF AN ACL DESIGNED TO ALLOW A SINGLE NETWORK.

This ACL only allows traffic from the source network 192.168.10.0 to be forwarded via the S0 / 0/0 interface. Traffic from networks other than the 192.168.10.0 network is blocked.
R1 (config) # access-list 1 permit 192.168.10.0 0.0.0.255
R1 (config) # interface s0 / 0/0
R1 (config-if) # ip access-group 1 out
On the first line, the ACL is identified as an access list 1. This list allows traffic that matches the selected parameters. In this case, the IPv4 address and wildcard mask that identify the source network are 192.168.10.0 0.0.0.255. Remember that there is an implicit denial of all instructions that are equivalent to adding the access-list line 1 deny 0.0.0.0 255.255.255.255 or access-list deny any at the end of the ACL.
The ip access-group 1 out interface configuration command links ACL 1 to Serial 0/0/0 as an output filter.
Therefore, ACL 1 only allows hosts on the 192.168.10.0/24 network to exit router R1. This list denies any other network, including the 192.168.11.0 network
EXAMPLES OF STANDARD ACLS NUMBERED IPV4
Continuing with the example of the previous image, let's look at the following commands: (Denial of a specific host and admission of a specific subnet)
R1 (config) # no access-list 1
R1 (config) # access-list 1 deny host 192.168.10.10
R1 (config) # access-list 1 permit 192.168.10.0 0.0.0.255
R1 (config) # interface s0 / 0/0
R1 (config-if) # ip access-group 1 out
The first command removes the previous version of ACL 1. The following ACL instruction denies the host of PC1 located at 192.168.10.10. All other hosts in the 192.168.10.0/24 network are then allowed. In this case, the implicit deny statement also matches all other networks.
The ACL is reapplied to the S0 / 0/0 interface in the output direction.
Now we show an example of an ACL that denies a specific host. This ACL replaces the previous example. In this example, host traffic PC1 is still blocked, but the rest of the traffic is allowed.
R1 (config) # no access-list 1
R1 (config) # access-list 1 deny host 192.168.10.10
R1 (config) # access-list 1 allow any
R1 (config) # interface g0 / 0
R1 (config-if) # ip access-group 1 in
The first two commands are the same as in the previous example. The first command removes the previous version of ACL 1, and the following ACL instruction denies host PC1 that is located at 192.168.10.10.
The third line is new and allows the rest of the hosts. This means that all hosts on the 192.168.10.0/24 network are allowed, except PC1, which was denied in the previous instruction.
This ACL is applied to the G0 / 0 interface in the input direction. Because the filter affects only the 192.168.10.0/24 LAN in G0 / 0, it is more efficient to apply the ACL to the input interface. The ACL can be applied to S0 / 0/0 in the outbound direction, but then R1 would have to examine the packets of all networks, including 192.168.11.0/24.
ACL SYNTAX WITH IPV4 STANDARD NAME
Naming ACLs makes it easier to understand their function. When the ACL is identified with a name instead of a number, the configuration mode and command syntax are subtly different.
Below are the steps necessary to create a standard named ACL.
- Step 1: In global configuration mode, use the ip access-list command to create a named ACL. ACL names are alphanumeric, are case sensitive and must be unique. The ip access-list standard name command is used to create one with a standard name. After entering the command, the router is in standard configuration mode (std) ACL with name (nacl) as indicated by the second indicator in:
Router (config-std-nacl) # [ permit | deny | remark ] {source [ source-wildcard ]} [ log ]Note : Numbered ACLs use the global access-list configuration command, while named IPv4 ACLs use the ip access-list command.
- Step 2: In the named ACL configuration mode, use the permit or deny instructions to specify one or more conditions to determine if a packet is forwarded or discarded. You can use remark to add a comment to the ACL.
- Step 3: Apply the ACL to an interface with the command ip access-group name . Specify whether the ACL should be applied to packets when they enter through the interface (in) or when they exit the interface (out).
Router (config-if) # ip access-group name [ in | out ]
The following are the commands used to configure a standard ACL with name on router R1, in which the G0 / 0 interface denies host 192.168.11.10 access to the 192.168.10.0 network. The ACL is called NO_ACCESS.
R1 (config) # ip access-list standard NO_ACCESS
R1 (config-std-nacl) # deny host 192.168.11.10
R1 (config-std-nacl) # permit any
R1 (config-std-nacl) # exit
R1 (config) # interface g0 / 0
R1 (config-if) # ip access-group NO_ACCESS out
It is not necessary for ACL names to begin with a capital letter, but this makes them stand out when the result of show running-config is observed. It also makes it less likely that you accidentally create two different ACLs with the same name but with different capitalization.
MODIFY IPL4 ACL
After familiarizing yourself with the process of creating and editing ACLs, it may be easier to generate the ACL using a text editor such as Microsoft Notepad. This allows you to create or edit the ACL and then paste it into the router interface. For an existing ACL, you can use the show running-config command to display the ACL, copy and paste it into the text editor, make the necessary changes and paste it back into the router interface.
Setting. Assume, for example, that the following IPv4 host address was entered incorrectly. Instead of host 192.168.10.99, it should be host 192.168.10.10. The steps to edit and correct ACL 1 are as follows:
R1 (config) # access-list 1 deny host 192.168.10.99
R1 (config) # access-list 1 permit 192.168.0.0 0.0.255.255
- Step 1: Display the ACL using the show running-config command . In the example in the illustration, the include keyword is used to show only ACEs.
access-list 1 deny host 192.168.10.99
access-list 1 permit 192.168.0.0 0.0.255.255
- Step 2: Select the ACL, copy it, and then paste it into Microsoft Notepad. Edit the list as necessary. Once the ACL is displayed correctly in Microsoft Notepad, select it and copy it.
access-list 1 deny host 192.168.10.10
access-list 1 permit 192.168.0.0 0.0.255.255
- Step 3: In global configuration mode, delete the access list with the no access-list 1 command . Otherwise, the new instructions will be added to the existing ACL. Next, paste the new ACL into the router configuration.
R1 # config t
Enter configuration commands, one per line. End with CNTL / Z.
R1 (config) # no access-list 1
R1 (config) # access-list 1 deny host 192.168.10.10
R1 (config) # access-list 1 permit 192.168.0.0 0.0.255.255
- Step 4: Verify changes using the show running-config command .
R1 # show running-config | include access-list 1
access-list 1 deny host 192.168.10.10
access-list 1 permit 192.168.0.0 0.0.255.255
It is necessary to remember that, when using the no access-list command , the different versions of the IOS software act differently. If the ACL that was removed is still applied to an interface, some versions of the IOS act as if there is no ACL that protects the network, while others deny all traffic. For this reason, it is advisable to remove the reference to the access list of the interface before modifying the list . If there is an error in the new list, you must disable it and solve the problem. In that case, the network has no ACL during the correction process.
METHOD 2: USE SEQUENCE NUMBERS
R1 (config) # access-list 1 deny host 192.168.10.99
R1 (config) # access-list 1 permit 192.168.0.0 0.0.255.255
As shown in the scheme above, a host instruction for host 192.168.10.99 was included in the initial configuration of ACL 1. But that was a mistake. Host 192.168.10.10 should have been configured. To edit the ACL with sequence numbers, follow these steps:
- Step 1: Display the current ACL using the show access-lists 1 command . The result of this command will be analyzed in more detail later in this section. The sequence number is shown at the beginning of each instruction. The sequence number was automatically assigned when the access list instruction was entered. Note that the instruction that is incorrectly configured has sequence number 10.
R1 # show access-lists 1
Standard IP access list 1
10 deny 192.168.10.99
20 permit 192.168.0.0, wildcard bits 0.0.255.255
R1 #
- Step 2: Enter the ip access-lists standard command that is used to configure named ACLs. The ACL number, 1, is used as a name. First, the misconfigured instruction must be removed with command no 10 , where "10" refers to the sequence number. Then, a new sequence number instruction 10 is added by command 10 deny host 192.168.10.10 .
R1 # conf t
R1 (config) # ip access-list standard 1
R1 (config-std-nacl) # no 10
R1 (config-std-nacl) # 10 deny host 192.168.10.10
R1 (config-std-nacl) # end
R1 #
Note: Instructions cannot be overwritten with the same sequence number as an existing instruction. First, the current instruction must be deleted and then the new one can be added.
- Step 3: Verify the changes using the show access-lists command .
R1 # show access-lists
Standard IP access list 1
10 deny 192.168.10.10
20 permit 192.168.0.0, wildcard bits 0.0.255.255
R1 #
As mentioned earlier, Cisco IOS implements internal logic in standard access lists. It is possible that the order in which standard ACEs are introduced is not the order in which they are stored, displayed or processed on the router. The show access-lists command shows ACEs with their sequence numbers.
STANDARD ACL EDITION WITH NAME
In an earlier example, sequence numbers were used to edit a standard ACL numbered IPv4. By reference to the sequence numbers of the instruction, individual instructions can be easily inserted or deleted. This method can also be used to edit standard named ACLs.
In the following scheme, an example of inserting a line in a named ACL is shown.
R1 # show access-lists
Standard IP access list NO_ACCESS
10 deny 192.168.11.10
20 permit 192.168.11.0, wildcard bits 0.0.0.255
R1 # conf t
Enter configuration commands, one per line. End with CNTL / Z.
R1 (config) # ip access-list standard NO_ACCESS
R1 (config-std-nacl) # 15 deny host 192.168.11.11
R1 (config-std-nacl) # end
R1 # show access-lists
Standard IP access list NO_ACCESS
10 deny 192.168.11.10
15 deny 192.168.11.11
20 permit 192.168.11.0, wildcard bits 0.0.0.255
R1 #
In the first result of the show command , you can see that the ACL with the name NO_ACCESS has two numbered lines that indicate the access rules for a workstation with the IPv4 address 192.168.11.10.
Instructions can be inserted or deleted from the named access list configuration mode.
To add an instruction to deny another workstation, a numbered line must be inserted. In the example, the workstation with the IPv4 address 192.168.11.11 is added using the new sequence number 15.
Using the last result of the show command , it is verified that the new workstation now has access denied.
Note : In the named access list configuration mode, enter the no sequence-number command to quickly remove individual instructions.
VERIFY Access Control List on Cisco
As shown below, the show ip interface command is used to verify the ACL on the interface. The result of this command includes the number or name of the access list and the direction in which the ACL was applied. The result shows that access list 1 is applied to the output interface S0 / 0/0 of router R1 and that the access list NO_ACCESS is applied to interface g0 / 0, also in the output direction.
R1 # show ip interface s0 / 0/0
Serial0 / 0/0 is up, line protocol is up
Internet address is 10.1.1.1/30
<The result was omitted>
Outgoing access list is 1
Inbound access list is not set
<The result was omitted>
R1 # show ip interface g0 / 0
GigabitEthernet0 / 0 is up, line protocol is up
Internet address is 192.168.10.1/24
<The result was omitted>
Outgoing access list is NO_ACCESS
Inbound access list is not set
<The result was omitted>
The result of issuing the show access-lists command on router R1 is shown below. To view an individual access list, use the show access-lists command followed by the number or name of the access list. The NO_ACCESS instructions may look strange. Note that sequence number 15 is shown before sequence number 10. This is due to the router's internal process and will be discussed later in this section.
R1 # show access-lists
Standard IP access list 1
10 deny 192.168.10.10
20 permit 192.168.0.0, wildcard bits 0.0.255.255
Standard IP access list NO_ACCESS
15 deny 192.168.11.11
10 deny 192.168.11.10
20 permit 192.168.11.0, wildcard bits 0.0.0.255
R1 #
Access Control List STATISTICS
Once the ACL was applied to an interface and some tests were performed, the show access-lists command shows the statistics for each instruction that has matches. In the result shown below, notice that matches were found for some of the instructions.
R1 # show access-lists
Standard IP access list 1
10 deny 192.168.10.10 (4 match (s))
20 permit 192.168.0.0, wildcard bits 0.0.255.255
Standard IP access list NO_ACCESS
15 deny 192.168.11.11
10 deny 192.168.11.10 (4 match (s))
20 permit 192.168.11.0, wildcard bits 0.0.0.255
R1 #
When traffic is generated that must match an ACL instruction, the matches shown in the result of the show access-lists command should increase. For example, in this case, if you ping from PC1 to PC3 or PC4, the result will show an increase in matches for the deny instruction of ACL 1.
R1 # show access-lists
Standard IP access list 1
10 deny 192.168.10.10 (8 match (s))
20 permit 192.168.0.0, wildcard bits 0.0.255.255
Standard IP access list NO_ACCESS
15 deny 192.168.11.11
10 deny 192.168.11.10 (4 match (s))
20 permit 192.168.11.0, wildcard bits 0.0.0.255
R1 #
Both permit and deny instructions keep track of match statistics; however, remember that each ACL has an implicit deny any instruction as the last instruction. This instruction does not appear in the show access-lists command, so no statistics are displayed for that instruction. To see the statistics of the implicit deny any instruction, the instruction can be configured manually and will appear in the result.
During the test of an ACL, the counters can be cleared using the clear access-list counters command . This command can be used alone or with the number or name of a specific ACL. As shown below, this command clears the statistics counters for an ACL.
R1 # show access-lists
Standard IP access list 1
10 deny 192.168.10.10 (4 match (s))
20 permit 192.168.0.0, wildcard bits 0.0.255.255
Standard IP access list NO_ACCESS
15 deny 192.168.11.11
10 deny 192.168.11.10 (4 match (s))
20 permit 192.168.11.0, wildcard bits 0.0.0.255
R1 # clear access-list counters 1
R1 #
R1 # show access-lists
Standard IP access list 1
10 deny 192.168.10.10
20 permit 192.168.0.0, wildcard bits 0.0.255.255
Standard IP access list NO_ACCESS
15 deny 192.168.11.11
10 deny 192.168.11.10 (4 match (s))
20 permit 192.168.11.0, wildcard bits 0.0.0.255
VTY Port Protection with Standard IPv4 ACL
You can improve the security of administrative lines by restricting access to VTY. VTY access restriction is a technique that allows you to define the IP addresses that are allowed to remotely access the router's EXEC process. You can control which IP addresses can access the router remotely by configuring an ACL and an access-class instruction on VTY lines. Use this technique with SSH to further improve administrative access security.
The access-class command configured in the line configuration mode restricts the input and output connections between a given VTY (on a Cisco device) and the addresses in an access list.
The syntax of the access-class command is as follows:
Router (config) # access-class acl-number { in [ vrf-also ] | out }
The in parameter limits the input connections between the addresses in the access list and the Cisco device, while the out parameter limits the output connections between a particular Cisco device and the addresses in the access list.
In Image 2, an example is shown in which a range of addresses is allowed to access the VTY lines from 0 to 4. The ACL in the illustration was configured to allow the 192.168.10.0 network to access the VTY lines of 0 to 4, but to deny the other networks.
To configure access lists in VTY, the following must be taken into account:
- Numbered and named access lists can be applied to VTYs.
- Identical restrictions must be established on all VTYs, because a user can try to connect to any of them.
R1 (config) # line vty 0 4
R1 (config-line) # local login
R1 (config-line) # transport input ssh
R1 (config-line) # access-class 21 in
R1 (config-line) # exit
R1 (config) # access-list 21 permit 192.168.10.0 0.0.0.255
R1 (config) # access-list 21 deny any
Note : Access lists apply to packets that are transported through a router, they are not designed to block packets that originate from the router. By default, outbound ACLs do not prevent remote access connections that are initiated from the router.
VTY PORT SECURITY VERIFICATION
After configuring the ACL to restrict access to VTY lines, it is important to verify that it works correctly. The following illustration shows two devices that try to connect to R1 via SSH. Access list 21 was configured on VTY lines on R1. PC1 manages to connect, while PC2 cannot establish an SSH connection. This is the expected behavior, since the configured access list allows access to VTY from the 192.168.10.0/24 network and denies the rest of the devices.
PC1> ssh 192.168.10.1
Login as: admin
Password: *****
R1>
PC2> ssh 192.168.11.1
ssh connect to host 192.168.11.1 port
22: Connection refused
PC2>
The result of R1 shows what is produced by issuing the show access-lists command after PC1 and PC2 attempt to connect using SSH.
R1 # show access-lists
Standard IP access list 21
10 permit 192.168.10.0, wildcard bits 0.0.0.255 (2 matches)
20 deny any (1 match)
R1 #
The coincidence in the permit line of the result is the product of a correct SSH connection of PC1. The match in the deny statement is due to the failed attempt of PC2, a device in the 192.168.11.0/24 network, to establish an SSH connection.
No comments:
Post a Comment